Uncategorized Document Review
Last updated: July 30, 2026
Data Integration serves as a centralized hub for managing patient-related documents, including scanned uploads, incoming faxes, and electronic labs. By categorizing documents as Administrative or Clinical, this system ensures efficient organization and accurate integration into patient charts. This guide provides detailed instructions for navigating Data Integration, uploading, linking, editing, and managing documents within Canvas Medical.
User’s Guide
This section outlines how to review and manage uncategorized reports within Canvas, whether you're working from the Schedule View or directly in a patient's chart.
Reviewing Uncategorized Reports
Uncategorized documents can be reviewed from two areas in the application:
From Schedule View
Navigate to the badge icons on the top-right of the Schedule View.
Click the triple dot menu to the right of the badges.
Select New Medical Documents.
A summary screen will appear showing all reports ready for review.
Choose the desired report to open:
Left Panel: Uncategorized Document Review Command
Right Panel: Report preview
Complete the following fields in the command:
Patient Message: Information for the patient (2048-character limit).
Patient Communication: Method of delivering the message.
Internal Comment: Staff-only notes (2048-character limit).
Click Sign to finalize the review.
From the Patient Chart
Use the search bar in the Schedule View to locate and open the patient’s chart.
Click the Medical Documents icon located in the top-right panel.
Select the card of the medical document you wish to review to expand it. Reports pending review will display a red badge in the upper-right corner of the card. The sorting logic for the cards is as follows:
Documents requiring review by the logged in user will be listed first
Documents that need review and are assigned to a team the logged-in user is part of will show second
All other documents not assigned to the logged in user or their team(s) will be sorted by descending occurrence date
Click Review to open the review modal. This modal displays the PDF document for the medical document along with review fields.
Heading: Displays the name of the document being reviewed
Patient message: Information to relay to the patient
Patient communication: Method to share message with the patient
Delegate call, can leave message: The caller can leave a message if the patient does not answer
A task will be created for the team with the responsibility Communicate Diagnostic Results to a Patient to call the patient and share the provider's message.
Delegate call, need patient to answer: The caller must speak to the patient directly and cannot leave a message.
A task will be created for the team with the responsibility Communicate Diagnostic Results to a Patient to call the patient and share the provider's message.
Already left message: A message has already been left for the patient based on what the provider reviewed.
Already reviewed with patient: The patient has already been made aware of what the provider reviewed.
Linked Items: The PDF of the reviewed item will automatically link here. You can attach related components of the patient's chart for reference.
Internal Comments: Content is only displayed internally for staff visibility. It will not display on any documents shared externally.
Click Sign to finalize the review process.
Reviewing Internal Comments for the Uncategorized Document Review
Internal comments for the Uncategorized Document Review are only visible on the command itself. Follow these steps to be routed directly to the command.
Navigate to the patient chart
Click the Uncategorized Records icon in the patient panel
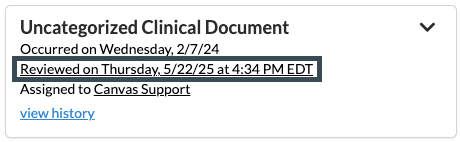
On the card for the uncategorized document, click Reviewed on [DATE] at [TIME]
A new tab will open that takes the user directly to the review command associated to the uncategorized document.
Assigning Processed Uncategorized Clinical Document to a New User or Team
Results can be assigned to a team or individual after the document has been processed through Data Integration and linked to a patient
Assigning Uncategorized Clinical Document to a Team
Click the Uncategorized Reports icon in the patient or user panel to open the result cards

Click the team link on the card to open the dropdown. It will either say No Team Assigned or state the name of the team currently assigned
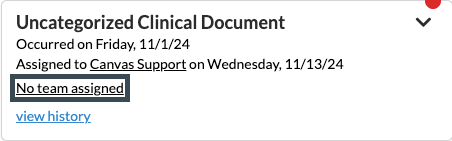
Select the team name from the dropdown
The document will show under the user's Uncategorized Reports in their panel
Assigning Uncategorized Clinical Document to an Individual User
Click the Uncategorized Reports icon on either the user or patient panels to open the document cards

Click the name of the assigned user to open the dropdown
A user will be assigned since it is required to process in Data Integration
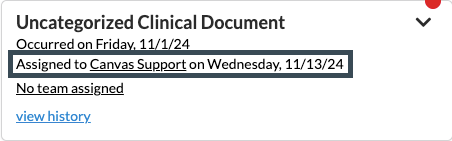
Select name of new assignee
The uncategorized clinical document will show under the user's Uncategorized Reports in their panel
Delegating an Uncategorized Document Review
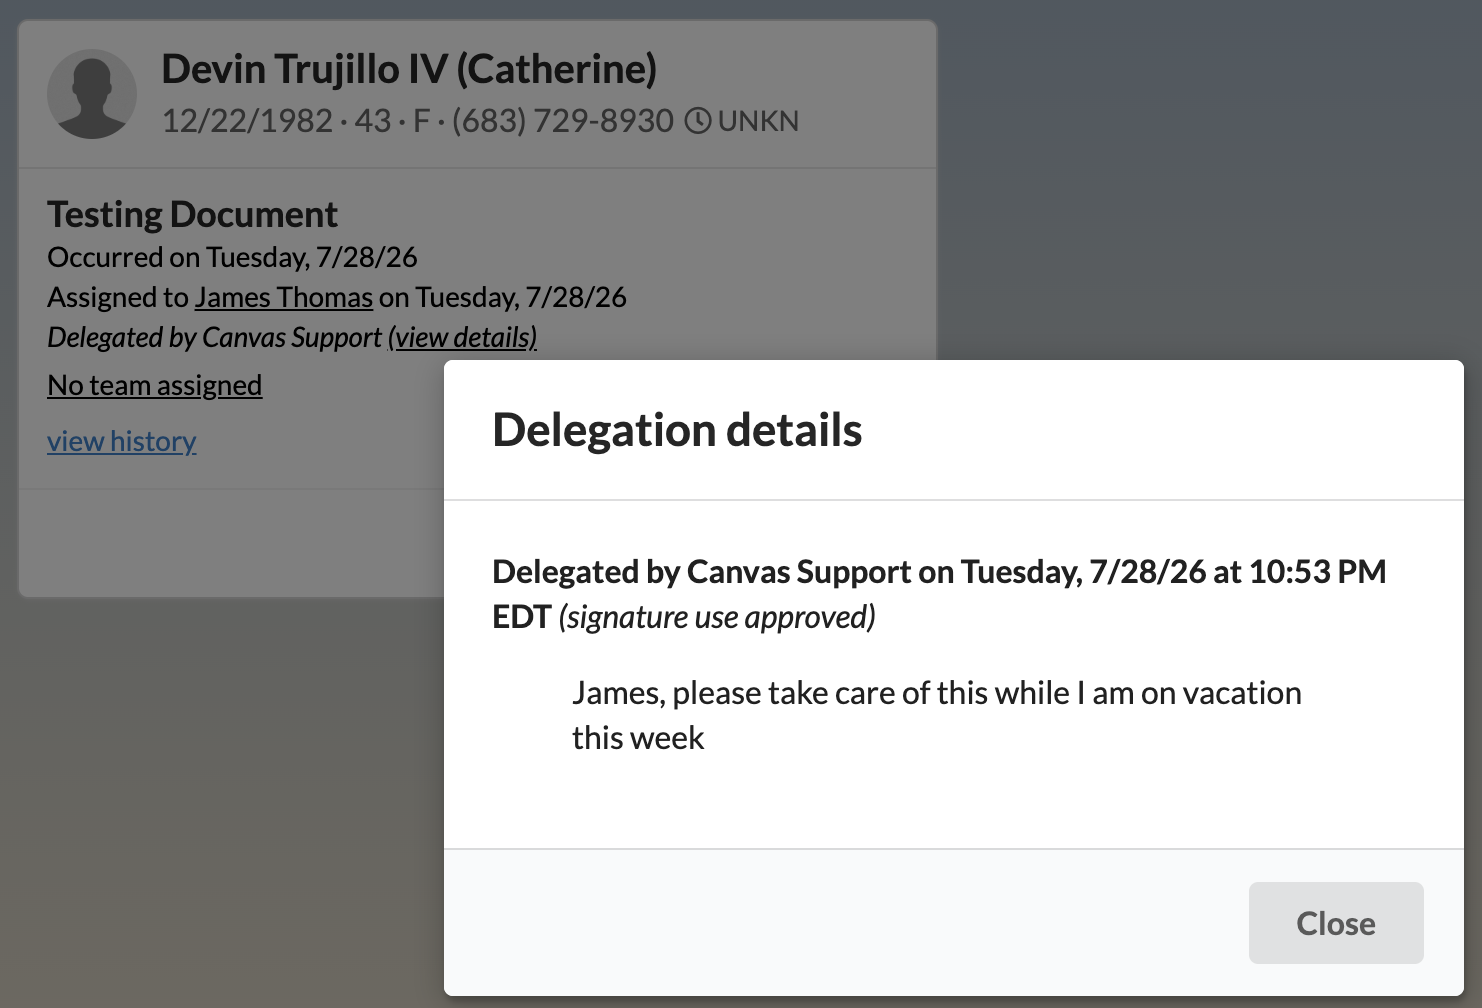
Delegation lets the current reviewer hand an uncategorized clinical document's review off to another staff member or team — with optional instructions and consent to apply your signature — and route it back to its owner when finished. Every hand-off is recorded so you can see the document's full delegation history.
The Delegate button appears in the review modal only for an uncategorized clinical document that still needs review and is awaiting action. It sits next to the SIGN button. (It won't appear on already-reviewed documents or on other review types such as lab, imaging, or referral reviews.)
To delegate a review
Open the uncategorized document's review — from the Schedule view badge or from the patient chart's Medical Documents icon (see Reviewing Uncategorized Reports above).
In the review modal, click Delegate.

In the Delegate document window, use Delegate to → Select staff or team to choose the recipient (an individual staff member or a team).
(Optional) Under Instructions, add a note for the recipient (Add instructions for the recipient).
(Optional) Check Allow the recipient to apply my signature to this document if the recipient may sign on your behalf. When they open the document in the editor, your signature becomes available to apply alongside their own, and it's stamped as your name with no "signed on behalf of" note. Leave it unchecked if they should complete or review the document but not sign for you. This consent covers only this delegation: it's cleared if the document is routed back to you or if its reviewer is changed directly.
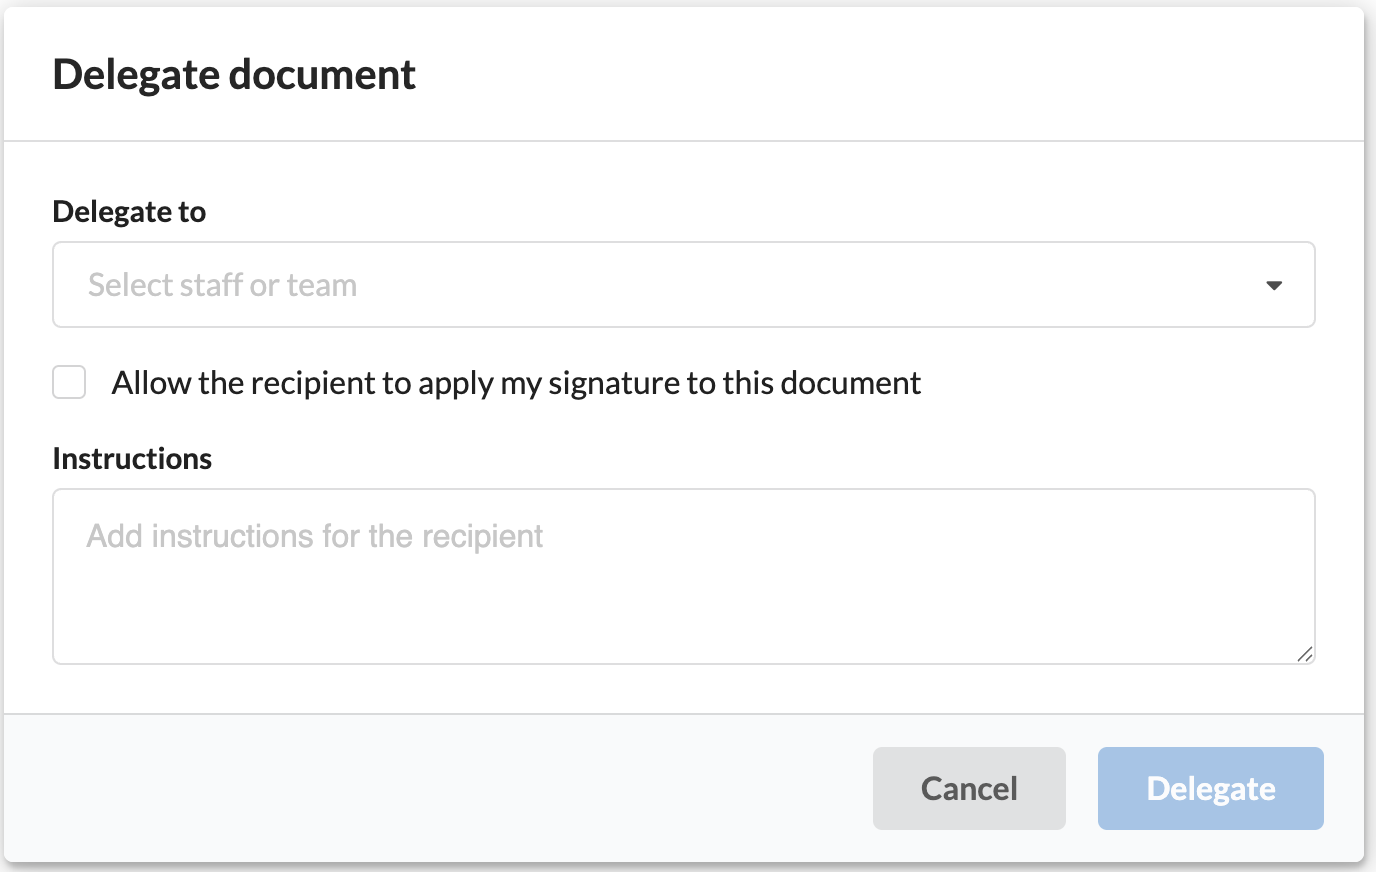
Submit. The document moves into the recipient's review queue.
To route a delegated document back to its owner
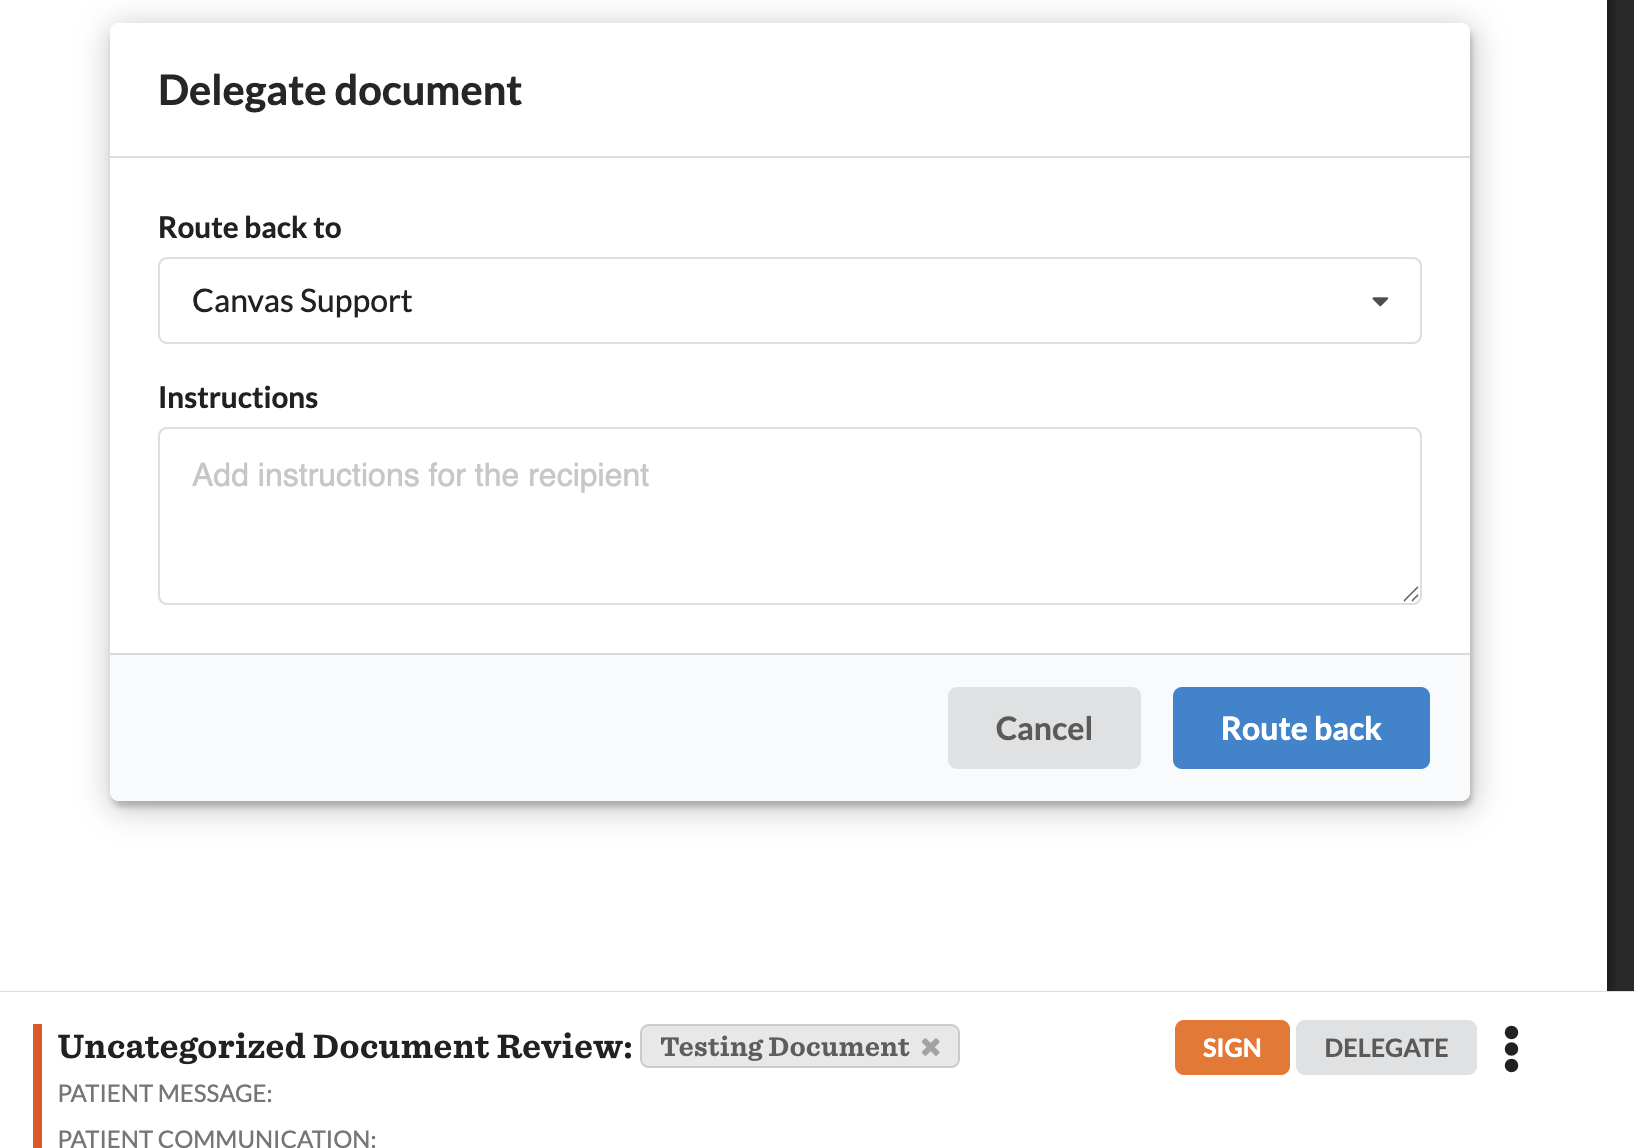
Open the review of a document that was delegated to you.
Click Delegate, then use Route back to to return it to the original owner.
(Optional) Add instructions, then submit. The document returns to the owner's queue.
To view a document's delegation history
You can open the delegation history two ways:
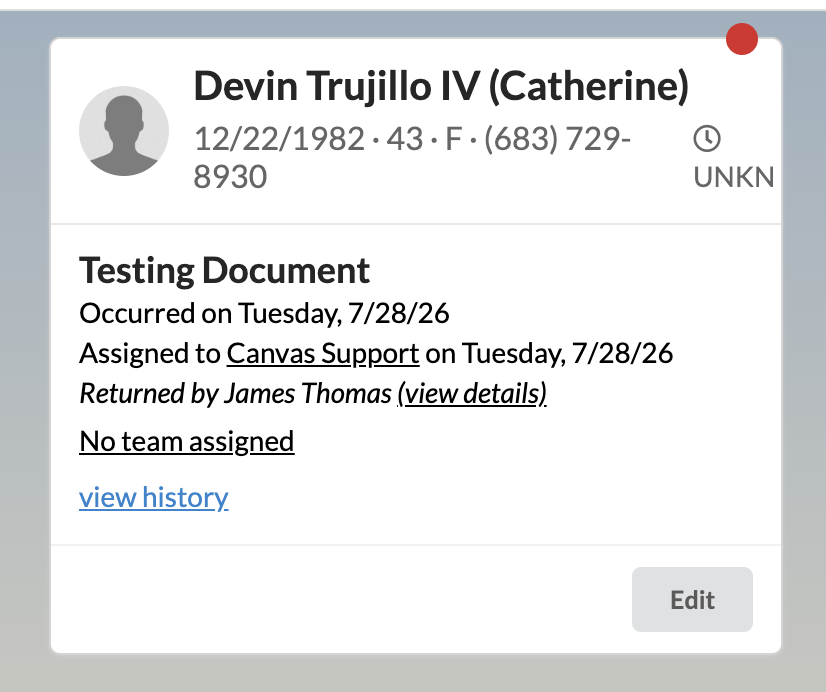
From the document card — click View details on the document card. This works in both the patient chart and the panel (worklist).
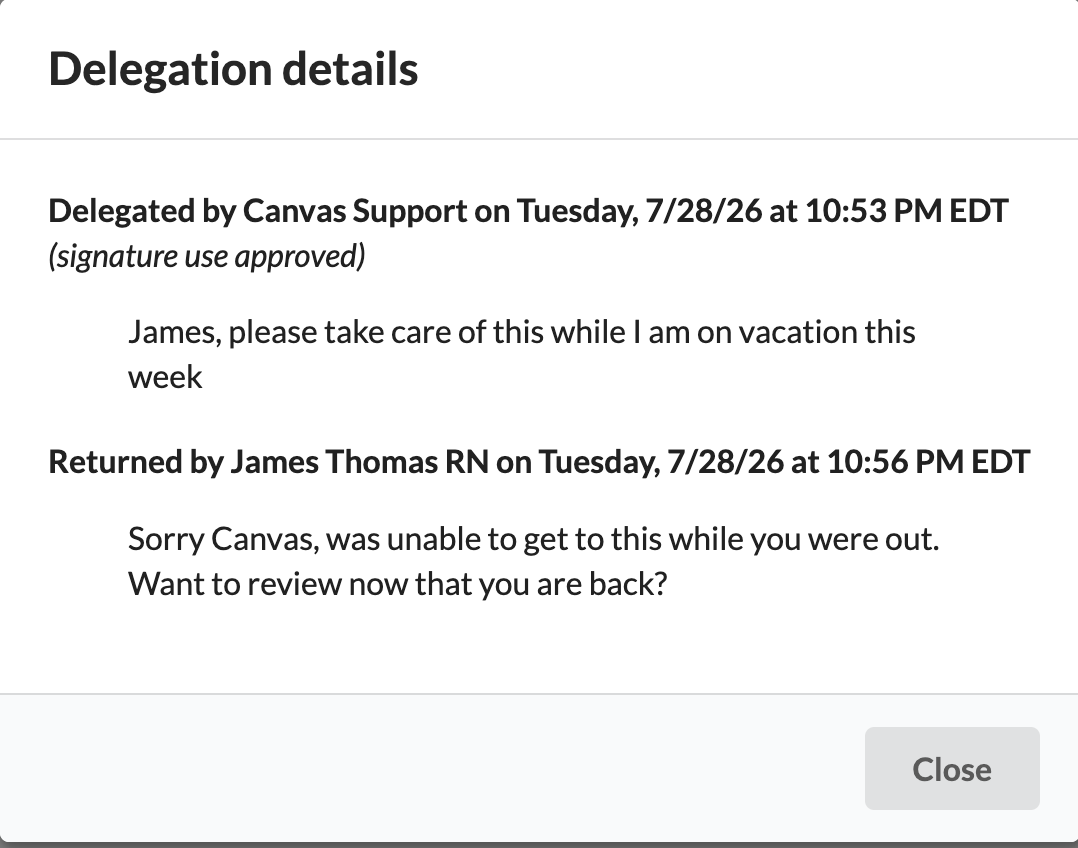
From the review modal — open the ⋮ (kebab) menu and select View delegation details.

Either opens the Delegation details panel, which shows each hand-off in order — e.g., "Delegated by [name]" and "Returned by [name]" — or "No delegation history." if the document has never been delegated.
Related Resources
• Processing Documents via Data Integration
Learn how to upload and assign clinical documents from the Canvas Data Integration system.
• Understanding Commands
Explanation of how commands influence workflows and documentation
Keywords & Categories
• Keywords: Uncategorized reports, document upload, Canvas Medical, Data Integration, patient chart, clinical documentation, chart review, review command
• Categories: Clinical Documentation, Data Integration, Patient Records, Workflow Management